Here is an example of such a gauge
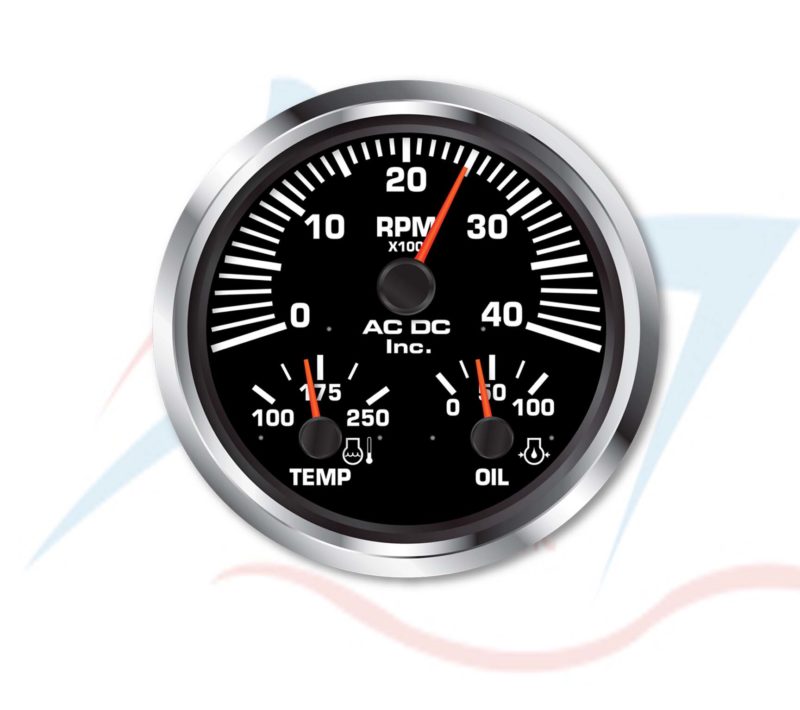
- 1x GaugeSkin (RPM)
- 2x Horizontal Skins (TEMP and OIL)
Overlaying those controls in one area is not a big problem because the standard background fill of the Medusa gauges is transparent, so we simply have to put all three gauges in one layout container.
So the idea is as follows, we create a new class named MultiGauge that extends Region. Therefore I use the following skeleton..
public class MultiGauge extends Region {
    private static final double  PREFERRED_WIDTH  = 250;
    private static final double  PREFERRED_HEIGHT = 250;
    private static final double  MINIMUM_WIDTH    = 50;
    private static final double  MINIMUM_HEIGHT   = 50;
    private static final double  MAXIMUM_WIDTH    = 1024;
    private static final double  MAXIMUM_HEIGHT   = 1024;
    private static       double  aspectRatio;
    private              boolean keepAspect;
    private              double  size;
    private              double  width;
    private              double  height;
    private              Pane    pane;


    // ******************** Constructors **************************************
    public MultiGauge() {
        getStylesheets().add(MultiGauge.class.getResource("styles.css").toExternalForm());
        getStyleClass().add(getClass().getSimpleName().toLowerCase());
        aspectRatio = PREFERRED_HEIGHT / PREFERRED_WIDTH;
        keepAspect  = true;
        init();
        initGraphics();
        registerListeners();
    }


    // ******************** Initialization ************************************
    private void init() {
        if (Double.compare(getPrefWidth(), 0.0) <= 0 || Double.compare(getPrefHeight(), 0.0) <= 0 ||
            Double.compare(getWidth(), 0.0) <= 0 || Double.compare(getHeight(), 0.0) <= 0) {
            if (getPrefWidth() > 0 && getPrefHeight() > 0) {
                setPrefSize(getPrefWidth(), getPrefHeight());
            } else {
                setPrefSize(PREFERRED_WIDTH, PREFERRED_HEIGHT);
            }
        }

        if (Double.compare(getMinWidth(), 0.0) <= 0 || Double.compare(getMinHeight(), 0.0) <= 0) {
            setMinSize(MINIMUM_WIDTH, MINIMUM_HEIGHT);
        }

        if (Double.compare(getMaxWidth(), 0.0) <= 0 || Double.compare(getMaxHeight(), 0.0) <= 0) {
            setMaxSize(MAXIMUM_WIDTH, MAXIMUM_HEIGHT);
        }
    }

    private void initGraphics() {

        pane = new Pane();

        getChildren().setAll(pane);
    }

    private void registerListeners() {
        widthProperty().addListener(o -> resize());
        heightProperty().addListener(o -> resize());
    }


    // ******************** Methods *******************************************
    private void handleControlPropertyChanged(final String PROPERTY) {
        if ("".equals(PROPERTY)) {

        }
    }


    // ******************** Resizing ******************************************
    private void resize() {
        width  = getWidth() - getInsets().getLeft() - getInsets().getRight();
        height = getHeight() - getInsets().getTop() - getInsets().getBottom();
        size   = width < height ? width : height;

        if (keepAspect) {
            if (aspectRatio * width > height) {
                width = 1 / (aspectRatio / height);
            } else if (1 / (aspectRatio / height) > width) {
                height = aspectRatio * width;
            }
        }

        if (width > 0 && height > 0) {
            // Use for square controls where width == height            pane.setMaxSize(size, size);
            pane.relocate((getWidth() - size) * 0.5, (getHeight() - size) * 0.5);

            // Use for rectangular controls width != height            pane.setMaxSize(width, height);
            pane.relocate((getWidth() - width) * 0.5, (getHeight() - height) * 0.5);

        }
    }
}
With this template you could easily compose a new control out of existing controls. So the main work we have to do is to create the three gauges and put them in the right location in the new control.
Let's start with the rpmGauge control. Because I've explained styling a Medusa gauge already in my blogpost "Building a fuel gauge using Medusa" I won't go through all the details but directly give you the code, here it is...
rpmGauge = GaugeBuilder.create()
                       .borderPaint(Color.WHITE)
                       .foregroundBaseColor(Color.WHITE)
                       .prefSize(400, 400)
                       .startAngle(290)
                       .angleRange(220)
                       .minValue(0)
                       .maxValue(4000)
                       .valueVisible(false)
                       .minorTickMarksVisible(false)
                       .majorTickMarkType(TickMarkType.BOX)
                       .mediumTickMarkType(TickMarkType.BOX)
                       .title("RPM\nx100")
                       .needleShape(NeedleShape.ROUND)
                       .needleSize(NeedleSize.THICK)
                       .needleColor(Color.rgb(234, 67, 38))
                       .knobColor(Gauge.DARK_COLOR)
                       .customTickLabelsEnabled(true)
                       .customTickLabelFontSize(40)
                       .customTickLabels("0", "", "10", "", "20", "", "30", "", "40")
                       .animated(true)
                       .build();
We add this code block to the initGraphics() method and we also have to add the rpmGauge as a member variable.
To give you an idea how it would look like, here is a little screenshot...

So the next thing we have to do is adding the temperature and oil gauge. Long story short, here is the code...
tempGauge = GaugeBuilder.create()
                        .skinType(SkinType.HORIZONTAL)
                        .prefSize(170, 170)
                        .autoScale(false)
                        .foregroundBaseColor(Color.WHITE)
                        .title("TEMP")
                        .valueVisible(false)
                        .angleRange(90)
                        .minValue(100)
                        .maxValue(250)
                        .needleShape(NeedleShape.ROUND)
                        .needleSize(NeedleSize.THICK)
                        .needleColor(Color.rgb(234, 67, 38))
                        .minorTickMarksVisible(false)
                        .mediumTickMarksVisible(false)
                        .majorTickMarkType(TickMarkType.BOX)
                        .knobColor(Gauge.DARK_COLOR)
                        .customTickLabelsEnabled(true)
                        .customTickLabelFontSize(36)
                        .customTickLabels("100", "", "", "", "", "", "", "175", "", "", "", "", "", "", "", "250")
                        .animated(true)
                        .build();

oilGauge = GaugeBuilder.create()
                       .skinType(SkinType.HORIZONTAL)
                       .prefSize(170, 170)
                       .foregroundBaseColor(Color.WHITE)
                       .title("OIL")
                       .valueVisible(false)
                       .angleRange(90)
                       .needleShape(NeedleShape.ROUND)
                       .needleSize(NeedleSize.THICK)
                       .needleColor(Color.rgb(234, 67, 38))
                       .minorTickMarksVisible(false)
                       .mediumTickMarksVisible(false)
                       .majorTickMarkType(TickMarkType.BOX)
                       .knobColor(Gauge.DARK_COLOR)
                       .customTickLabelsEnabled(true)
                       .customTickLabelFontSize(36)
                       .customTickLabels("0", "", "", "", "", "50", "", "", "", "", "100")
                       .animated(true)
                       .build();
After adding both gauges to our control it will now look like this...

It's not perfect but also not too bad...and it works :)
The only thing that we now miss is how to resize and relocate the gauges correctly, well that's pretty simple and here is the related code from the resize() method of our MultiGauge control...
private void resize() {
    double width  = getWidth() - getInsets().getLeft() - getInsets().getRight();
    double height = getHeight() - getInsets().getTop() - getInsets().getBottom();
    size          = width < height ? width : height;

    if (size > 0) {
        pane.setMaxSize(size, size);
        pane.relocate((getWidth() - size) * 0.5, (getHeight() - size) * 0.5);

        rpmGauge.setPrefSize(size, size);

        tempGauge.setPrefSize(size * 0.425, size * 0.425);
        tempGauge.relocate(size * 0.1, size * 0.5625);

        oilGauge.setPrefSize(size * 0.425, size * 0.425);
        oilGauge.relocate(size * 0.475, size * 0.5625);
    }
}
As you can see it is really simple to resize and relocate the controls within our MultiGauge control. To get access to the gauges I simply added three get methods for each gauge and that's all it needs :)
You will find the complete example on github.
That's it for today...so keep coding... :)
Very impressive!
ReplyDeleteGreat stuff... As always
ReplyDeletecan i use this on my Desktop Programs?? any copyright issue?
ReplyDeleteApache 2.0...so feel free to use it...that's the main intention of this library :)
DeleteIt is fantastic library! But very sad, that impossible use this library in android studio projects..
ReplyDeleteAs always amazing job, thanks for sharing
ReplyDelete